PushKit 的集成
实际上项目中很早就由我提出要将现有的 APNs 更改为 PushKit 了。只不过当初后端的同学很忙,没有时间搞这个...
现在因为要接入 CallKit,所以这个不搞不行了。那么也来记录一下吧。
这篇文章中没有涉及到证书的申请,这块儿我还不太会,等到未来接触了会回过来补充的
流程
导入框架
Xcode设置
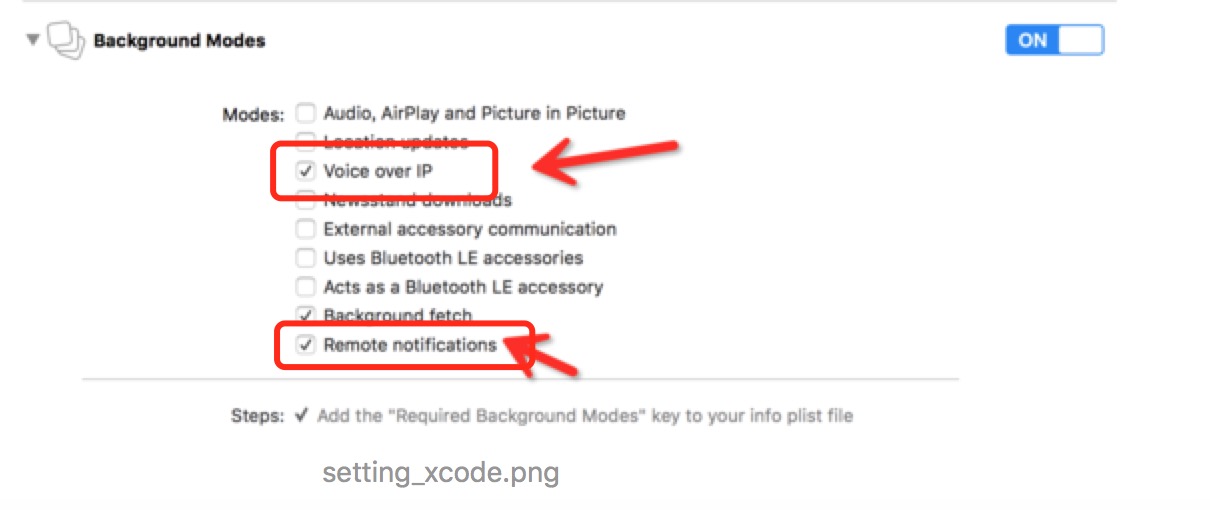
这里要区分一下 Xcode 的版本。如果你的版本是 Xcode 9 以前的版本,那么请按照如下步骤配置:
- 在
Xcode中选中你的项目,切换到主Target下。 - 点击
capabilities选项卡,找到Background Modes这一项。 - 勾选
Voice over IP以及Remote notifications两项即可。
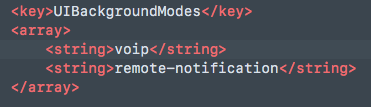
如果你的 Xcode 版本是 Xcode 9 及以上版本,那么很遗憾。苹果在 Background Modes 中移除了 Voice over IP 这一项,所以我们只能选择手动地在 info.plist 文件中进行配置:
-
我们可以选择
Open As Source Code模型,然后添加如下代码:
-
我们也可以直接打开
info.plist文件,然后在Required background modes中添加图中的这项。

最后我们在 Build Phases 的 Link Binary With Libraries 中添加 PushKit 的系统库,如下图所示:

AppDelegate.m
首先我们在 AppDelegate.m 中导入头文件:
#import <PushKit/PushKit.h>
其次我们还需要遵守 PKPushRegistryDelegate 协议。
注册推送
我们在 AppDelegate.m 文件中,编写如下方法:
// 注册pushKit推送
- (void)registerPushKitNotification {
    if ([UIDevice currentDevice].systemVersion.floatValue >= 8.0) {
        PKPushRegistry *pushRegistry = [[PKPushRegistry alloc] initWithQueue:dispatch_get_main_queue()];
        pushRegistry.delegate = self;
        pushRegistry.desiredPushTypes = [NSSet setWithObject:PKPushTypeVoIP];
    }
}
- 注意:
PushKit的支持是需要 iOS 系统大于 8.0 的。PKPushTypeVoIP是一个key值,具体的会放在后面讲解。
之后我们在 application:didFinishLaunchingWithOptions: 方法中调用上述方法即可。
代理方法
pushRegistry:didUpdatePushCredentials:
PKPushRegistryDelegate 协议中有一个必须要实现的代理方法:
- (void)pushRegistry:(PKPushRegistry *)registry didUpdatePushCredentials:(PKPushCredentials *)pushCredentials forType:(PKPushType)type;
简单说一下,就是当收到一个指定的 PKPushType(这是一个枚举)类型的新的 credentials(凭证/证书)(包括 push token)时,就会调用这个方法。
在这个方法中,我们可以获取 token 值,然后将其缓存起来:
- (void)pushRegistry:(PKPushRegistry *)registry didUpdatePushCredentials:(PKPushCredentials *)credentials forType:(NSString *)type {
    NSLog(@"--- Token ---%@ ====%@", credentials.token, [credentials.token description])

    NSString *deviceTokenStr = [[credentials.token description] stringByReplacingOccurrencesOfString:@" " withString:@""];
    deviceTokenStr = [deviceTokenStr stringByReplacingOccurrencesOfString:@"<" withString:@""];
    deviceTokenStr = [deviceTokenStr stringByReplacingOccurrencesOfString:@">" withString:@""];

    NSUserDefaults *groupDefault = [[NSUserDefaults alloc] initWithSuiteName:GroupDefaultsName];
    [groupDefault setValue:deviceTokenStr forKey:DeviceTokenKey];
    [groupDefault synchronize];
}
pushRegistry:didInvalidatePushTokenForType:
接着我们可以在 pushRegistry: didInvalidatePushTokenForType: 方法中清除 Token
- (void)pushRegistry:(PKPushRegistry *)registry didInvalidatePushTokenForType:(PKPushType)type {
    NSUserDefaults *groupDefault = [[NSUserDefaults alloc] initWithSuiteName:GroupDefaultsName];
    [groupDefault setValue:@"" forKey:DeviceTokenKey];
    [groupDefault synchronize];
}
pushRegistry:didReceiveIncomingPushWithPayload:
接下来的代理方法特别重要,那就是 pushRegistry:didReceiveIncomingPushWithPayload: 。这个方法不是必须实现,但是我们一般将业务逻辑写在该方法中。
一般我们可以在这个方法中执行 CallKit 相关的代码,或者结合本地推送进行操作。
- (void)pushRegistry:(PKPushRegistry *)registry didReceiveIncomingPushWithPayload:(PKPushPayload *)payload forType:(PKPushType)type {

    // your code
}
参考
论养成一个好的习惯有多重要.....当初写这篇文章的时候居然忘记记录参考了,结果现在回过头来补充的时候找不到当初的参考了....如果您发现这篇文章引用了您的文章,请评论或者邮件告诉我,我会在这里引用上您的文章链接。谢谢!